
Hiking · Independent guide
Oeschinensee Panorama Hike: Heuberg Route Guide
Travel facts checked
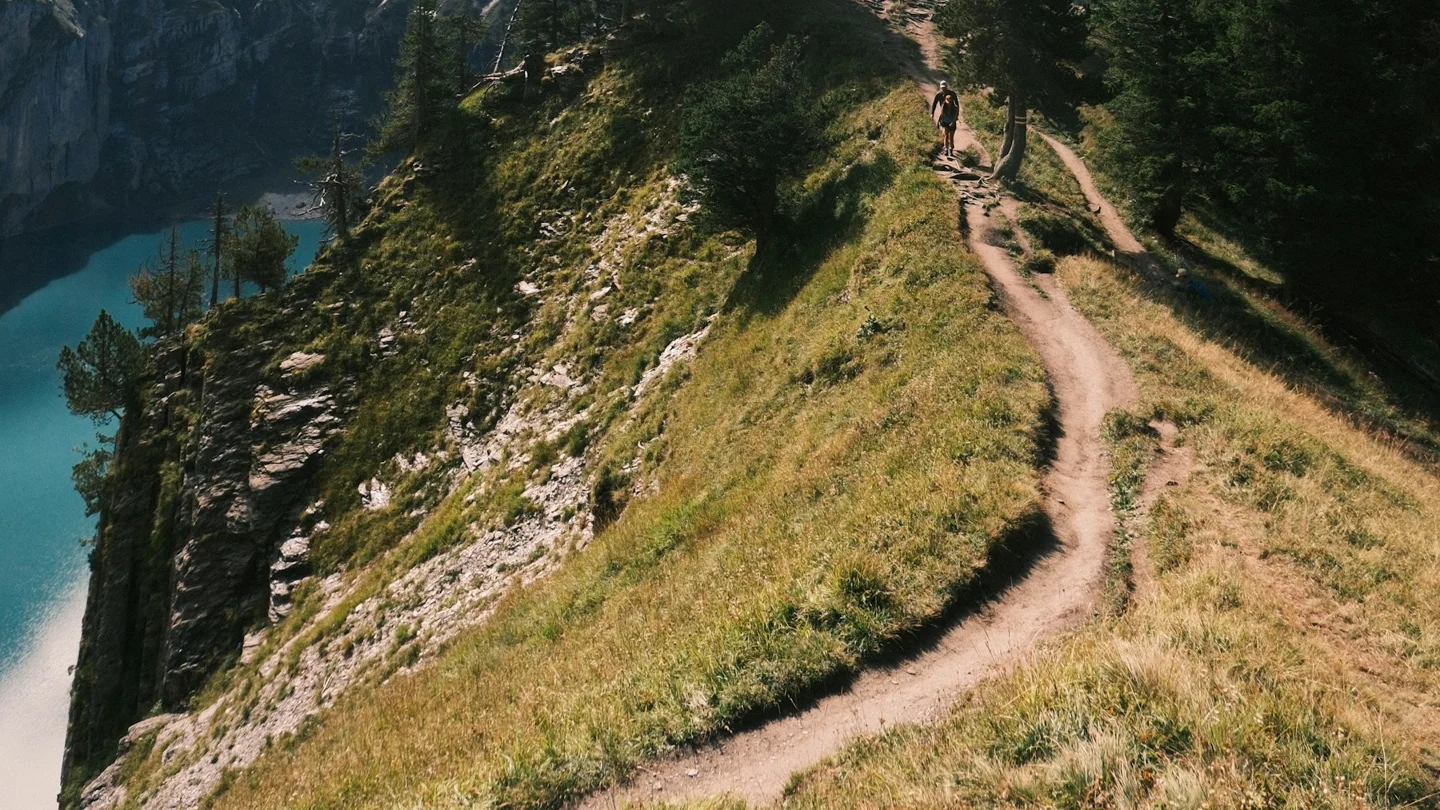
Check the Heuberg route segments, exposure and return plan before choosing the high trail above the lake.
In this guide11
- Oeschinensee panorama hike: which route this means
- Check the open sections before setting out
- Oeschinensee panorama hike time and effort
- Start from the upper gondola station
- Which direction to walk
- Footwear, equipment and navigation
- Weather and surface conditions
- Reasons to turn back or take the lower option
- Plan the final return
- Panorama route questions
- Oeschinensee panorama hike verdict
The Oeschinensee panorama hike through Heuberg is a mountain route above the lake. It suits hikers who are comfortable on narrow, exposed ground and can keep a steady pace. It is not the same outing as the easier path from the gondola station to the water.
Plan the entire walk, including the return, before taking the lift. A quoted time for one section can sound short while leaving out the approach, rests, shore visit and journey back to the upper station.
Choose the Heuberg route only with suitable mountain experience, firm footing and good conditions. Verify the Läger–Heuberg–Oberbärgli segment and the return sections individually. Start with enough time to finish well before the last gondola, and use the easier lake path if the group or conditions do not fit a high traverse. The route's views do not reduce its exposure.
Oeschinensee panorama hike: which route this means
This guide covers the high mountain route through Heuberg towards Oberbärgli, often described as a panorama circuit. It does not cover a flat walk around the lake. It also does not describe the easier path D through Läger as though that were the same high route.
The operator's hiking guidance, checked 14 October 2026, identifies the Heuberg mountain route as trail G. It describes narrow terrain for experienced hikers with a head for heights and good stamina. Use those requirements as the starting point for your decision.
The names Heuberg, Läger and Oberbärgli are route points, not interchangeable hike titles. Identify them on a current map so that a sign at a junction has meaning. A saved track labelled only “lake loop” can hide whether it climbs into mountain terrain.
The hiking overview compares the high route with the simpler lake-access paths. If your main goal is an easy lake visit, that comparison may save you a walk that the group did not want.
Check the open sections before setting out
On the checked date, the live trail list showed trail G from Läger through Heuberg to Oberbärgli as open. That is a dated observation, not a standing promise. It does not certify a complete personal itinerary or guarantee the surface on a future day.
Check the return segments as well as the upper traverse. A loop needs all of its connections. Do not read one open line and assume an old track's whole circuit is usable. The digital map and on-site signs should agree with the route you intend to follow.
The same status source listed path B at Huble as closed for construction, with no continuous path. Do not use it as a shortcut to or from the village. Trail A from the lower station was a separate open approach on the checked date; the two routes should not be confused.
Keep a copy of your planned route, but treat it as navigation support rather than permission to ignore a closure. If a barrier blocks a section, turn back or choose a confirmed alternative. Following other walkers through a closed area does not make it safe or authorised.
Oeschinensee panorama hike time and effort
The operator gives about one hour and fifteen minutes for the Läger–Heuberg–Oberbärgli segment. That figure is not a complete circuit time. You must add the route from your starting point to Läger, the chosen return and stops, plus any lake visit.
We do not give one fixed full-loop duration here because the starting point and open return can change the outing. Use a current map for your exact route and calculate a slower pace for narrow or rough sections. Build in time to rest without losing the return margin.
Height gain is only one measure of effort. A narrow traverse above a drop can demand focus even when you are not climbing quickly. Fatigue can make that footing harder late in the day. Judge the whole group, including anyone who is uneasy with heights.
Walking up from Kandersteg first adds a separate climb. The approach guide covers that choice. Do not add its time to a short panorama estimate and call the sum a reliable whole-day duration; rests and the route back still need room.
Start from the upper gondola station
Using the lift preserves energy for the high route. Check the ascent reservation and the last descent before choosing your starting time. An early slot is useful only when the conditions and path status fit the walk; it is not a reason to start in unsafe weather.
At the upper station, take time to read the route signs and compare them with your map. Decide whether you will keep the high route or switch to a shore visit. That decision is easier while you are near a clear junction and have most of the day left.
Follow signed directions towards the planned mountain points. The easy path to the shore can be a fallback, but a sign to the lake does not necessarily mean it is the next leg of your high circuit. Check the junction rather than treating every descent towards water as equivalent.
If you reach the upper station late, shorten the outing from the start. A rushed traverse combines a tight lift deadline with ground where care matters. It is better to enjoy the lake and leave the high route for another day.
Which direction to walk
Choose direction from the current mapped route, open segments and on-site advice. There is no universal direction that makes this mountain outing easy. The same narrow ground remains narrow whichever way you enter it.
Think about where your group would rather climb and descend. A steep downhill section can be more difficult for sore knees or uncertain footing. A climb late in the day can also be demanding when water or energy is running low. Match the order to your abilities rather than a general “best direction” claim.
Crowding can affect the pace on a narrow trail. Leave enough room to pass only where the ground allows it. Do not step towards an edge to overtake or try to maintain a fast pace through a line of walkers.
The view may open at several points, so you do not need to stop at the most awkward ledge. Use broader, secure places for photographs and breaks. A route should work safely without requiring every person to get the same picture.
Footwear, equipment and navigation
Use hiking footwear with grip that fits the route and your feet. The mountain-trail requirements call for sure footing, suitable equipment and awareness of mountain hazards. A smooth-soled city shoe is a poor fit for loose or wet terrain.
Carry water and enough food for the whole outing. Do not treat a route point with refreshments on an old map as a guaranteed resupply. Pack a warm layer and rain protection, even when the valley start is pleasant. Conditions can change while you are above the lake.
Use a topographic map that shows the actual paths and terrain, not just a road map with a lake pin. Keep it available offline and bring a charged phone. Know the route points before you need to interpret a junction under cloud or rain.
Poles can be useful on some sections but do not remove exposure. Keep both hands available where the terrain requires it. Camera straps and loose items should not interfere with balance. Stop in a safe place to adjust equipment instead of doing it while moving on a narrow path.
Weather and surface conditions
A high lake view needs visibility, but the safety decision comes before the view. If cloud or wind makes the route uncertain, choose a confirmed lower path. Do not push on because you have already paid for the ascent.
Wet rock and snow can change a walk sharply. A clear camera view at the lake may not show a shaded patch on the upper traverse. Check the current status and webcams together, and use on-site information to fill the gaps.
Season labels are not surface guarantees. A summer timetable can coexist with remaining snow on higher ground. Autumn can bring colder conditions and fewer hours to recover from a slow start. Summer route directions should not be used as a winter plan.
If you stay in the valley, move the high hike to the clearer day when your bookings permit it. That may leave the first day for a short lake visit or a village walk. A flexible stay has a cost, so compare it with the value of having room to choose conditions.
Reasons to turn back or take the lower option
Turn back early if the group feels uncomfortable with exposure or is moving too slowly for the return. Unease at the first narrow section is useful information. You do not need to reach the halfway point to justify choosing a shorter day.
Stop and reconsider if the route does not match your map, a sign reports closure or the weather reduces visibility. Do not follow an unsigned shortcut to regain a track. Returning along a known open section may be the more sensible choice.
A shore visit remains a worthwhile outing. Taking the lower option does not spoil the day; it changes the aim from completing a route to enjoying the lake with more margin. Choose it while you still have enough time to make that plan work.
Plan the final return
Set a latest return time to the upper station before leaving it. Work backwards from the last descent, then include your walk from the final route point. Keep a buffer for slow ground and the boarding queue. The last service is not the time to leave the lake.
If your plan ends with a village descent on foot, verify that exact trail. The closed Huble path is not an available spare route. Walking down after a demanding traverse also adds fatigue, so include it in the original decision rather than improvising it after missing the lift.
Use the lake overview to combine transport and hiking plans with meal timing. A good mountain day includes a return that the group can manage without rushing.
Panorama route questions
Is Heuberg a beginner walk?
The operator describes it as a mountain route for experienced hikers with stamina and a head for heights. Do not choose it as a beginner's short lake stroll. Use the easier open paths from the upper station if the group needs a less exposed outing or has limited mountain experience.
Does the quoted trail time cover the whole circuit?
No. The checked one-hour-fifteen-minute time applies to trail G between Läger and Oberbärgli through Heuberg. Add the start, return sections and rests, then the lake visit for your actual plan. Treat blog timings with care if they use different endpoints or describe a faster walker.
Can I use the same route in winter?
Do not carry summer directions into snow conditions. Winter access and hazards require separate route information and skills. The gondola's operation does not make the high mountain trail open. Follow the current winter guidance and leave this route out unless its conditions and requirements are clearly established.
Oeschinensee panorama hike verdict
The Oeschinensee panorama hike is a prepared mountain day, not a quick shore detour. Confirm every section, plan a realistic pace and protect the return margin. Choose Heuberg for the right group in the right conditions; choose the lower lake paths when those requirements do not fit.